
Use AOQ with qwen-audio-3.1-asr-flash-streaming to implement voice input

This tutorial describes how to use the AOQ SDK with qwen-audio-3.1-asr-flash-streaming to implement voice input.

Solution overview

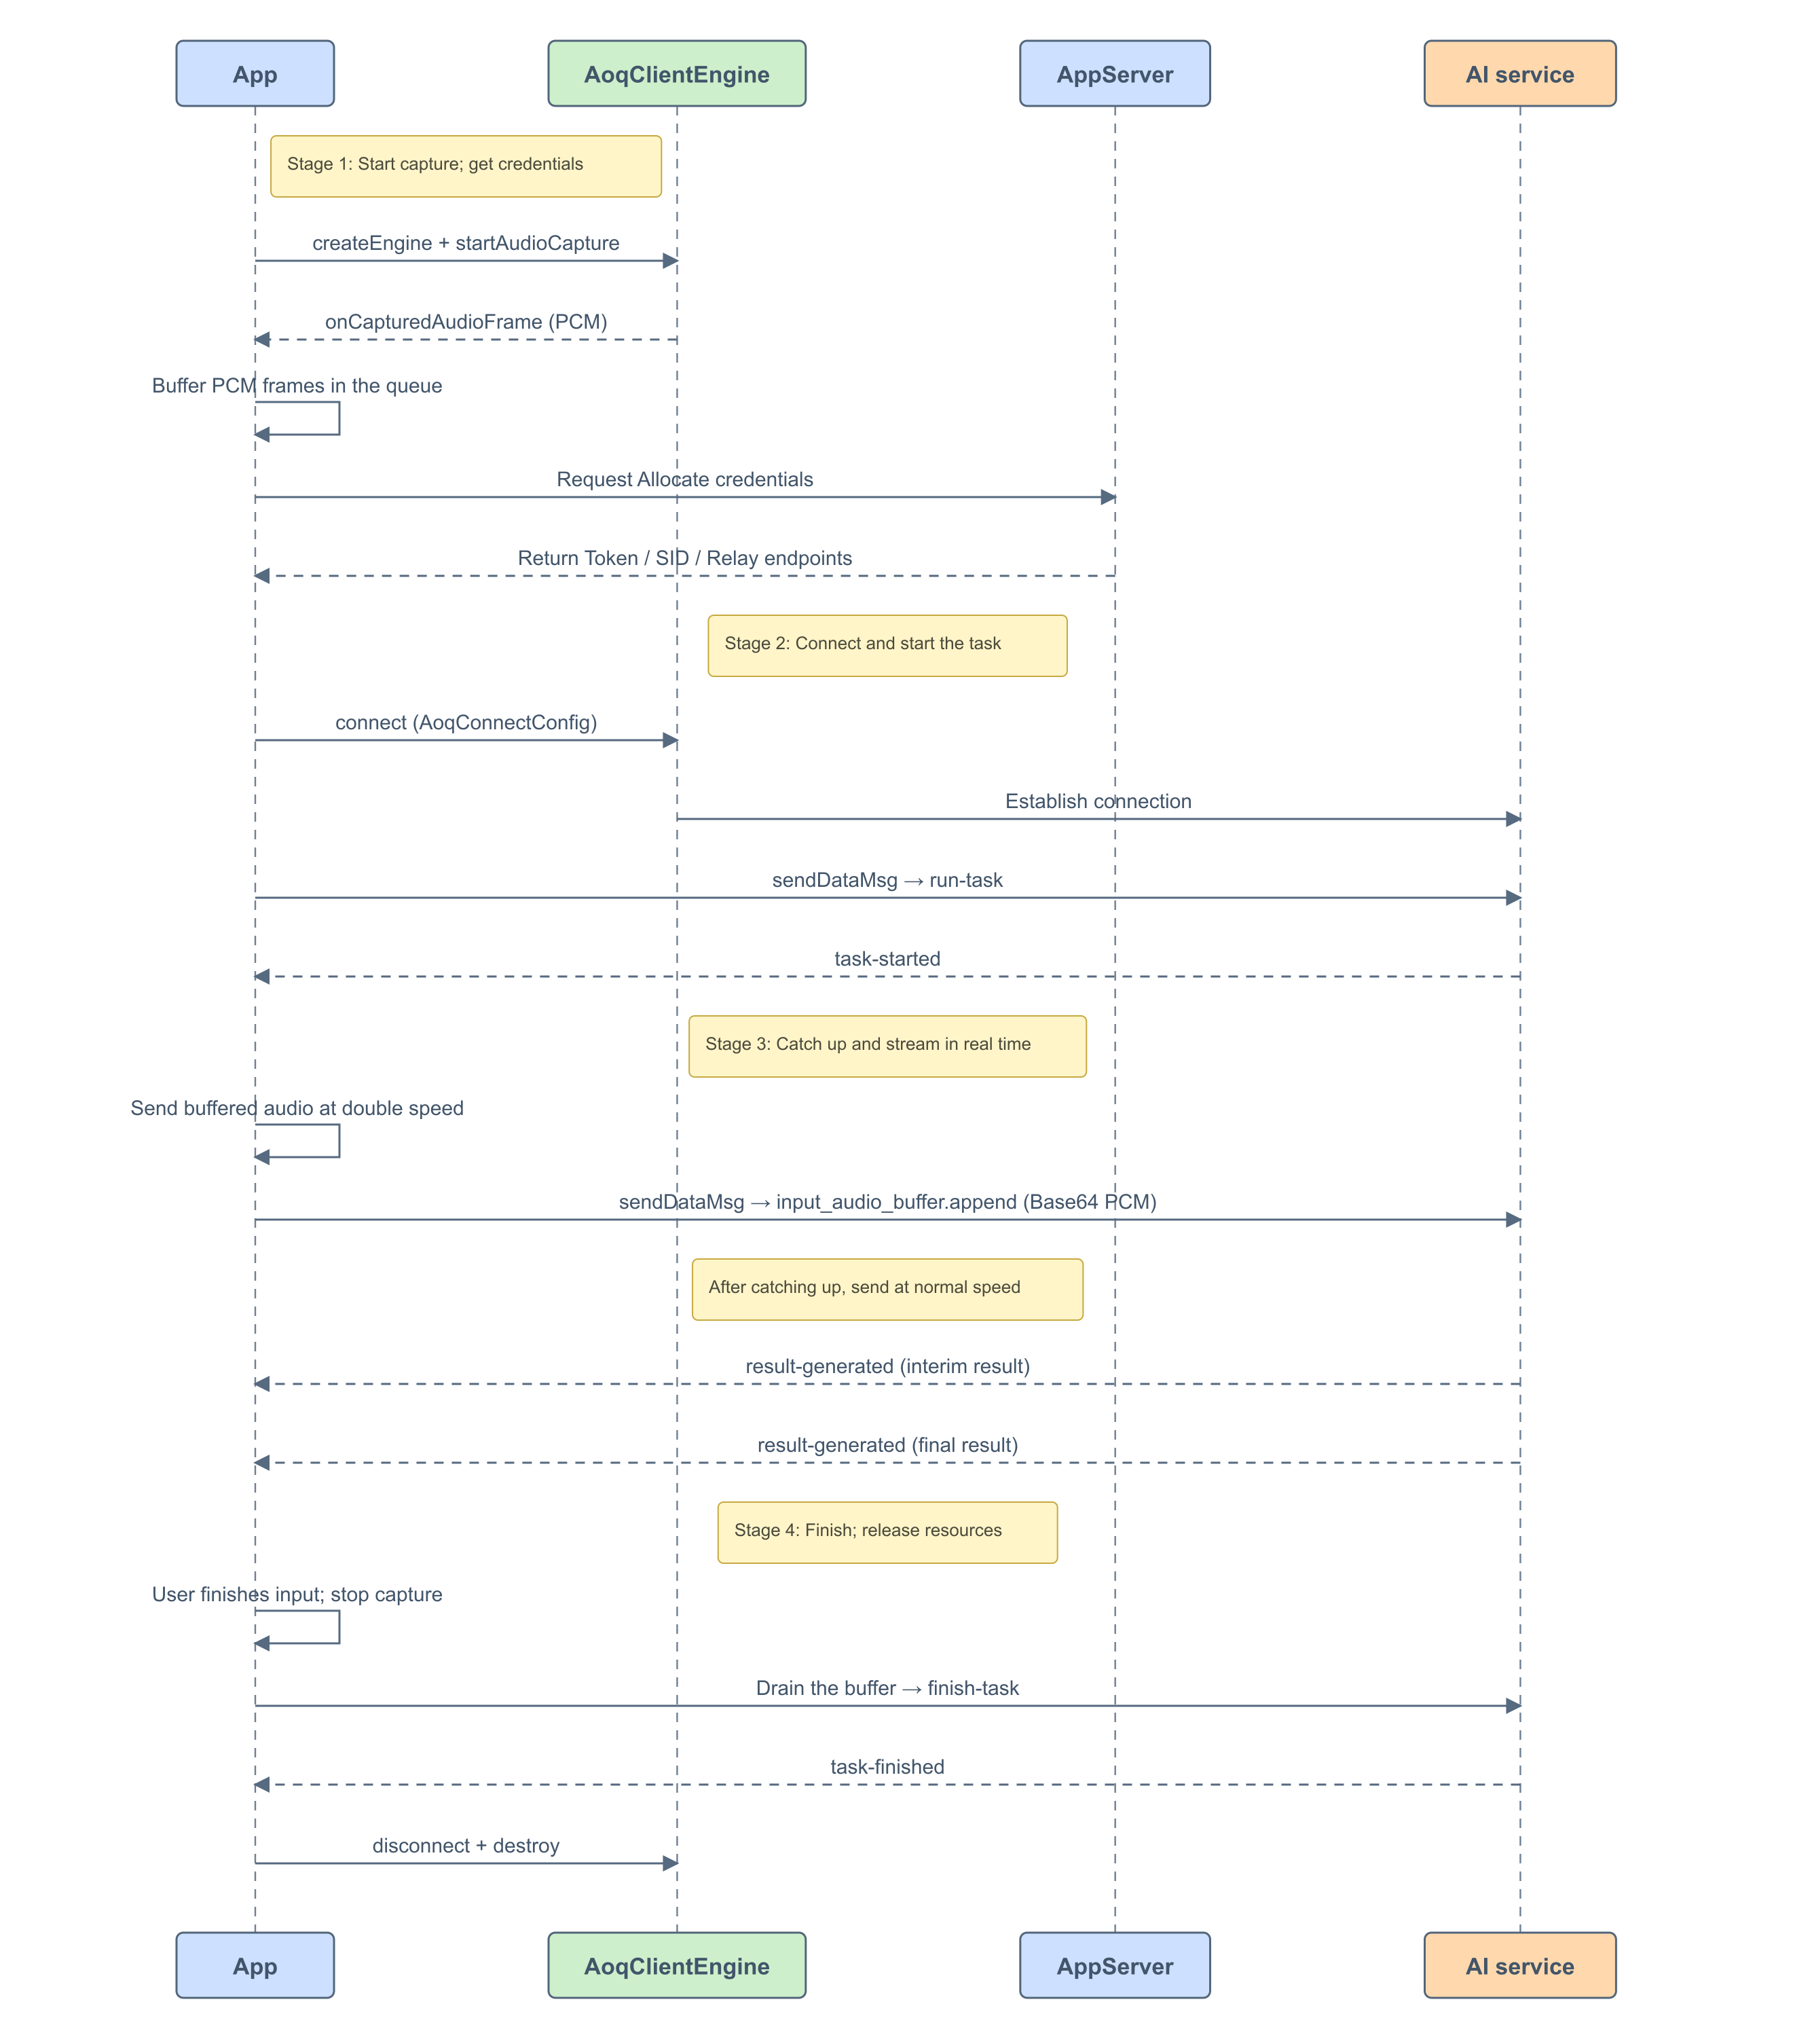
A typical voice-input interaction starts when the user clicks the voice-input button and begins speaking. Recognition results appear in the input field in real time. The client implementation has the following key points:
  1. Capture immediately: Start capturing audio and buffering PCM data as soon as the user clicks the button, while asynchronously requesting connection credentials and establishing the connection. Because connection setup takes time and the user may already be speaking, buffer the audio first and send it afterward.
  2. Catch up at double speed: After the connection succeeds and the model-ready event arrives, send the buffered audio to the model at double speed. Switch to real-time transmission after catching up.
  3. Transmit audio over the Data channel: qwen-audio-3.1-asr-flash-streaming uses the Inference protocol (run-task / continue-task / finish-task). This scenario requires buffering audio before sending it at double speed, so use sendDataMsg to transmit audio as JSON messages. The AOQ server supports the JSON audio message format and automatically parses the messages into binary data to forward to the model.
  4. Interim and final results: The model continuously returns recognition results. Display interim results (sentence_end: false) in real time and append final results (sentence_end: true) to the input field.

Prerequisites

Before you begin

  1. Activate Alibaba Cloud Model Studio and obtain an API key as described in Obtain and configure an API key. Store the API key only on your AppServer. Do not embed it in client code or commit it to a code repository.
  2. Set {endpoint} to {WorkspaceId}.cn-beijing.maas.aliyuncs.com for China (Beijing) or {WorkspaceId}.ap-southeast-1.maas.aliyuncs.com for Singapore. Replace the placeholder with your workspace ID and use the API key for the corresponding region and workspace.
  3. Download the latest AOQ Client SDK from SDK download.
  4. Set up an AppServer and implement server-side proxy authentication as described in Token authentication. Before each new connection, the client must obtain new connection credentials from the AppServer.

Import the SDK

Download the latest AOQ Client SDK from SDK download and import the SDK for your development platform. The following client examples use Android. Other platforms use the same interface design and event flow.
  • Android
  • iOS
  • HarmonyOS
  • Linux (Python)
  1. Place libPluginOpus.so from the Opus plugin in app/src/main/jniLibs/armeabi-v7a/ and app/src/main/jniLibs/arm64-v8a/ based on the ABI. Place AoqClientSdk-release.aar in app/libs, and configure the dependencies and supported ABIs in app/build.gradle:
    android {
        defaultConfig {
            minSdk 21
            ndk { abiFilters 'armeabi-v7a', 'arm64-v8a' }
        }
    }
    
    dependencies {
        implementation fileTree(dir: 'libs', include: ['*.aar'])
    }
    
  2. Declare the following permissions in AndroidManifest.xml:
    <uses-permission android:name="android.permission.INTERNET" />
    <uses-permission android:name="android.permission.ACCESS_NETWORK_STATE" />
    <uses-permission android:name="android.permission.RECORD_AUDIO" />
    <uses-permission android:name="android.permission.MODIFY_AUDIO_SETTINGS" />
    
  3. Request the RECORD_AUDIO permission at runtime before using the microphone.

Obtain a token on the AppServer

The client obtains connection credentials through the AppServer. Implement server-side proxy authentication as described in Token authentication. The AppServer calls the Model Studio allocation API and returns the token, SID, relay endpoints, and other information required for the SDK connection.
curl -X POST \
  "https://{endpoint}/api/v1/webrtc/inference?model=qwen-audio-3.1-asr-flash-streaming" \
  -H "Content-Type: application/json" \
  -H "Authorization: Bearer ${DASHSCOPE_API_KEY}" \
  -H "x-dashscope-rtc-transport: moq" \
  -d "{\"clientIp\": \"${CLIENT_REAL_IP}\"}"
Response fieldSDK field
aoqTokenForClientAoqConnectConfig.token
sidAoqConnectConfig.sid
clientRelayCertFingerprintAoqConnectConfig.certFingerprint
clientRelayEndpointsAoqConnectConfig.relayEndpoints
extraInfo.workspaceIdHashAoqConnectConfig.workspaceIdHash

Client implementation

Voice-input client sequence
The following steps use Android and follow the implementation order. Other platforms use the same interface design and event flow.

1. Create the engine and register callbacks

Create an AoqClientEngine instance and register connection-status and Data-message callbacks. Send run-task after the connection succeeds. The Data-message callback handles server events.
// Create the engine
AoqClientEngine.AoqCreateConfig create = new AoqClientEngine.AoqCreateConfig();
create.workDir = getCacheDir().getAbsolutePath();
engine = AoqClientEngine.createEngine(this, create, new AoqClientListener() {
    @Override
    public void onConnectionStatusChange(
            @NonNull AoqClientEngine.AoqConnectionStatus state) {
        if (state == AoqClientEngine.AoqConnectionStatus.AoqConnectionStatusConnected) {
            // Connected: send run-task (see step 4)
        }
    }

    @Override
    public void onDataMsg(@NonNull AoqClientEngine.AoqDataMsg msg) {
        // Parse server events (see step 5)
    }

    @Override
    public void onError(int code, String message) {
        // Handle errors
    }
});

2. Configure audio encoding and start capture

Configure PCM encoding (16 kHz, mono), register a capture callback with setAudioFrameObserver to obtain PCM data, and call enableSendMediaStream(Audio, false) to disable outgoing audio media (audio is sent over the Data channel). Finally, call startAudioCapture() to start capture. This example uses the AOQ SDK's built-in capture and obtains PCM data through onCapturedAudioFrame. You can also implement your own audio capture, such as Android AudioRecord. Add the captured PCM data to the buffer queue; the subsequent transmission logic is identical.
  • Approach A: Built-in SDK capture
  • Approach B: Custom capture
The example calls startAudioCapture, obtains PCM data through onCapturedAudioFrame, and copies it into the application buffer. Register the raw-capture callback for AoqAudioSourceCaptured to buffer audio before the connection is established.
int SAMPLE_RATE = 16000;

// Configure PCM encoding
AoqClientEngine.AoqAudioCodecConfig codec = new AoqClientEngine.AoqAudioCodecConfig();
codec.codecType = AoqClientEngine.AoqEncoderType.AoqEncoderTypeAudioPCM;
codec.sampleRate = SAMPLE_RATE;
codec.channel = 1;
codec.bitrate = 256000;
engine.setAudioEncoderConfig(codec);

// Register the capture callback
engine.setAudioFrameObserver(new AoqClientListener.AoqAudioFrameListener() {
    @Override
    public void onCapturedAudioFrame(
            @NonNull AoqClientEngine.AoqAudioFrameData frame) {
        if (frame.dataPtr != null && frame.dataSize > 0) {
            // Buffer PCM data in the queue (see step 5)
            pcmQueue.offer(frame.dataPtr, frame.dataSize);
        }
        Arrays.fill(frame.dataPtr, (byte) 0);  // Clear the buffer to prevent outgoing audio media
    }
});

AoqClientEngine.AoqAudioObserverConfig observer = new AoqClientEngine.AoqAudioObserverConfig();
observer.sampleRate = SAMPLE_RATE;
observer.channels = 1;
observer.mode = AoqClientEngine.AoqAudioObserverMode.AoqAudioObserverModeReadWrite;
engine.enableAudioFrameObserver(true,
        AoqClientEngine.AoqAudioSource.AoqAudioSourceCaptured, observer);

// Disable outgoing audio media (send audio over the Data channel)
engine.enableSendMediaStream(AoqClientEngine.AoqTrackType.AoqTrackTypeAudio, false);

// Start capture immediately, without waiting for the connection
engine.startAudioCapture(new AoqClientEngine.AoqAudioCaptureConfig());
Choose one of these approaches to avoid starting two recorders simultaneously. With custom capture, the application is responsible for format conversion, confirming that capture has stopped, and releasing audio devices.

3. Configure connection credentials and tracks, and connect

Populate AoqConnectConfig with the credentials returned by the AppServer. Publish Audio + Data tracks and subscribe to the Data track. The Audio track declaration is required for the connection, but outgoing audio media is disabled. Actual audio is transmitted over the Data channel.
An Audio track must be published: The ASR model requires an Audio track declaration when connecting; otherwise, the connection fails. Audio data is not sent over the audio media channel, but over the Data channel in input_audio_buffer.append messages. Call enableSendMediaStream(Audio, false) before connecting to disable outgoing audio media and prevent the SDK from automatically sending captured audio.
// Build the connection configuration after obtaining credentials from AppServer
AoqClientEngine.AoqConnectConfig config = new AoqClientEngine.AoqConnectConfig();
config.token = aoqTokenForClient;
config.sid = sid;
config.certFingerprint = clientRelayCertFingerprint;
config.workspaceIdHash = workspaceIdHash;
// Parse relayEndpoints from the response and add them to the configuration

// Publish Audio + Data tracks
AoqClientEngine.AoqTrackParam audioTrack = new AoqClientEngine.AoqTrackParam();
audioTrack.trackType = AoqClientEngine.AoqTrackType.AoqTrackTypeAudio;
config.publishTracks.add(audioTrack);

AoqClientEngine.AoqTrackParam dataTrack = new AoqClientEngine.AoqTrackParam();
dataTrack.trackType = AoqClientEngine.AoqTrackType.AoqTrackTypeData;
config.publishTracks.add(dataTrack);

// Subscribe to the Data track
AoqClientEngine.AoqTrackParam subData = new AoqClientEngine.AoqTrackParam();
subData.trackType = AoqClientEngine.AoqTrackType.AoqTrackTypeData;
config.subscribeTracks.add(subData);

// Establish the connection
engine.connect(config);

4. Send run-task to start recognition

After the connection succeeds, generate a new task_id for each voice-input round, for example with UUID.randomUUID().toString(). In the connection-success callback, use sendDataMsg to send the following JSON. Send run-task only once per round. The run-task event has the following structure. The task ID is an example value; replace it with the newly generated ID for the current round. For event details, see Client events.
{
  "header": {
    "action": "run-task",
    "task_id": "9fb212ea-6f83-4aef-9b8e-1bdd71f1d4d3",
    "streaming": "duplex"
  },
  "payload": {
    "task_group": "audio",
    "task": "asr",
    "function": "recognition",
    "model": "qwen-audio-3.1-asr-flash-streaming",
    "parameters": {
      "format": "pcm",
      "sample_rate": 16000
    },
    "input": {}
  }
}
Control and audio messages are sent through the same sendDataMsg interface:
String taskId = UUID.randomUUID().toString();
JSONObject root = new JSONObject()
        .put("header", new JSONObject()
                .put("action", "run-task")
                .put("task_id", taskId)
                .put("streaming", "duplex"))
        .put("payload", new JSONObject()
                .put("task_group", "audio")
                .put("task", "asr")
                .put("function", "recognition")
                .put("model", "qwen-audio-3.1-asr-flash-streaming")
                .put("parameters", new JSONObject()
                        .put("format", "pcm")
                        .put("sample_rate", 16000))
                .put("input", new JSONObject()));

AoqClientEngine.AoqDataMsg msg = new AoqClientEngine.AoqDataMsg();
msg.data = root.toString().getBytes(StandardCharsets.UTF_8);
engine.sendDataMsg(msg);

5. Send buffered audio at double speed after task-started

Parse JSON in onDataMsg. Switch transmission to the ready state only after receiving the following event for the current task.
{
  "header": {
    "event": "task-started",
    "task_id": "9fb212ea-6f83-4aef-9b8e-1bdd71f1d4d3"
  },
  "payload": {}
}
The example above includes the key event fields. Read other response fields as needed. For event details, see Server events. At this point, the buffer usually contains audio captured while requesting credentials, establishing the AOQ connection, and starting the model task. Check that responses containing task_id match the current task ID. A duplicate task-started must not start another transmission loop. Audio message format: The Inference protocol for qwen-audio-3.1-asr-flash-streaming (Client events) defines only three control events: run-task, continue-task, and finish-task. Audio itself is not sent as a JSON event. However, transmission over the AOQ Data channel requires audio to be sent as JSON messages. For this purpose, AOQ wraps audio data in an input_audio_buffer.append event at the SDK layer:
FieldTypeDescription
typestringFixed value: input_audio_buffer.append
event_idstringUnique event identifier for correlation and deduplication
audiostringBase64-encoded PCM audio data
The client Base64-encodes captured PCM data, wraps it in this JSON structure, and sends it through sendDataMsg. The AOQ server decodes the audio field into binary PCM data and forwards it to the ASR model according to the model protocol. The client does not need to handle binary-frame encapsulation. Ensure that the PCM format (sample rate, channel count, and bit depth) matches format and sample_rate declared in run-task.
{
    "type": "input_audio_buffer.append",
    "event_id": "event_550e8400-e29b-41d4-a716-446655440000",
    "audio": "AQID//+AgAAEAACAAAAA..."
}
Send audio data: Read PCM data from the buffer queue, wrap it in an input_audio_buffer.append JSON message, and send it through sendDataMsg:
byte[] pcm = pcmQueue.poll(640);  // Read one PCM frame

if (pcm != null) {
    JSONObject event = new JSONObject()
            .put("type", "input_audio_buffer.append")
            .put("event_id", "event_" + UUID.randomUUID())
            .put("audio", Base64.encodeToString(pcm, Base64.NO_WRAP));

    AoqClientEngine.AoqDataMsg msg = new AoqClientEngine.AoqDataMsg();
    msg.data = event.toString().getBytes(StandardCharsets.UTF_8);
    engine.sendDataMsg(msg);
}
Handle server events: Parse server events in the onDataMsg callback. Start sending audio on task-started and parse recognition results on result-generated. For event details, see Server events.
JSONObject root = new JSONObject(new String(msg.data, StandardCharsets.UTF_8));
String event = root.optJSONObject("header").optString("event");

if ("task-started".equals(event)) {
    // Model ready: send buffered audio at double speed, then stream in real time
} else if ("result-generated".equals(event)) {
    // Parse recognition results (see step 6)
    JSONObject sentence = root.optJSONObject("payload")
            .optJSONObject("output").optJSONObject("sentence");
    if (sentence != null && !sentence.optBoolean("heartbeat")) {
        String text = sentence.optString("text", "");
        boolean isFinal = sentence.optBoolean("sentence_end");
        // Display recognition results
    }
} else if ("task-finished".equals(event)) {
    // Task finished
} else if ("task-failed".equals(event)) {
    // Task failed
}

6. Handle and display recognition results

The result-generated event carries a recognized sentence with fields such as text and sentence_end. Display interim results in real time and append final results to the input field. For event definitions, see Server events.
private void handleRecognitionResult(JSONObject root) {
    JSONObject payload = root.optJSONObject("payload");
    JSONObject output = payload == null ? null : payload.optJSONObject("output");
    JSONObject sentence = output == null ? null : output.optJSONObject("sentence");
    if (sentence == null || sentence.optBoolean("heartbeat")) return;

    String text = sentence.optString("text", "");
    if (text.isEmpty()) return;
    boolean isFinal = sentence.optBoolean("sentence_end");

    // Display interim results in real time; append final results
    listener.onResult(text, isFinal);
}

7. Send finish-task to end recognition

When the user finishes input, first call engine.stopAudioCapture() to stop capture. Wait until the remaining PCM data in the buffer is drained, then send finish-task to notify the server that all audio has been sent. For event definitions, see Client events.
The task_id must match the run-task for the current round.
The finish-task event has the following structure:
{
    "header": {
        "action": "finish-task",
        "task_id": "UUID",
        "streaming": "duplex"
    },
    "payload": {
        "input": {}
    }
}
Send it through sendDataMsg:
engine.stopAudioCapture();  // Stop capture

// Wait for the buffer to drain, then send finish-task
JSONObject root = new JSONObject()
        .put("header", new JSONObject()
                .put("action", "finish-task")
                .put("task_id", taskId)
                .put("streaming", "duplex"))
        .put("payload", new JSONObject()
                .put("input", new JSONObject()));

AoqClientEngine.AoqDataMsg msg = new AoqClientEngine.AoqDataMsg();
msg.data = root.toString().getBytes(StandardCharsets.UTF_8);
engine.sendDataMsg(msg);
When the model finishes, it returns the following key event:
{
  "header": {
    "event": "task-finished",
    "task_id": "9fb212ea-6f83-4aef-9b8e-1bdd71f1d4d3"
  },
  "payload": {}
}

8. Disconnect and destroy the engine

After receiving task-finished, release resources as follows if you no longer need to reuse the connection. Also release resources in an error or timeout scenario.
engine.stopAudioCapture();
engine.setAudioFrameObserver(null);
engine.disconnect();
AoqClientEngine.destroy();
engine = null;

Usage notes

  1. Wait for task-started before sending audio; otherwise, the data is discarded.
  2. Send finish-task only after the buffer is drained (queue.size() == 0) to ensure that the model processes the last audio segment.
  3. Do not disconnect immediately after task-finished. You can reuse the connection for a new task with a new task_id.
  4. Ignore heartbeat packets (heartbeat: true) in result-generated. Do not treat them as recognition results.

Common scenarios

Recognize multiple rounds over one connection

The connection remains available after task-finished. The client can send run-task again with a new task_id to start another round without reconnecting. This is suitable for continuous voice input and reduces repeated connection latency.
// After the first round finishes (task-finished received)
// Send run-task with a new task_id to start the second round
taskId = UUID.randomUUID().toString();
sendRunTask();

Implement custom audio capture

This example uses the AOQ SDK's built-in capture (startAudioCapture + onCapturedAudioFrame). You can also implement your own audio capture. Add captured PCM data (16 kHz, mono, 16-bit) to PcmQueue. The subsequent buffered catch-up and transmission logic is identical.
Token Plan
Model Playground
  • Audio generation
  • Music generation
Statistics and Monitoring
Asset Center
Support